|
|
|
The Build Goes On.........
|
|
|
|
|
|
|
|
|
|
|
|
|
|
|
|
I'd decided this was going to be a HOT ROD, so of course, I was going to need hotrod components.
Back when I actually HAD money, I'd bought the things that were going to make the bike sturdy down the middle, and flashy
on the sides. One of my main ideas for this bike was the one thing that separates the MEN FROM THE BOYS when it comes
to motorcycle riding. Any boy can ride a regular motorcycle....but if you wanted to be a MAN......you needed a SUICIDE
CLUTCH AND A JOCKEY SHIFT! LOL... The only experience I'd ever had with a hand shift bike was back when I owned my old
Servicar. This however, was a beast of a different story! Foot clutch, under the knee shifting was the mark
of a true hotrod in my mind. I'd shopped around, and while I couldn't afford the high end ones, there were suitable
ones at a more reasonable price. So like I do almost always when it comes to buying things for myself, I went with
a familiar name, at the middle-of-the-road price. Never the most expensive (they're charging for the name)
and never the cheapest (probably just garbage) I paid good money for this set up from Custom Chrome at H
& H CYCLE near Kitchener, Ont. Woody and Nance are good people and keep their "Mom &
Pop" style independant shop in the old school style. Willing to help find what you want, without trying to pry every nickel
out of your wallet.
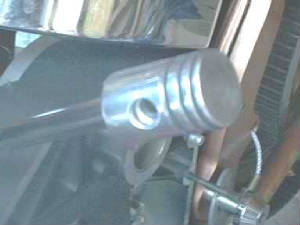
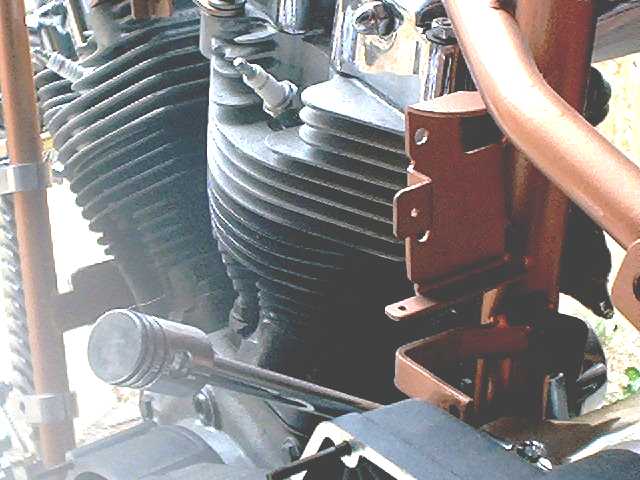
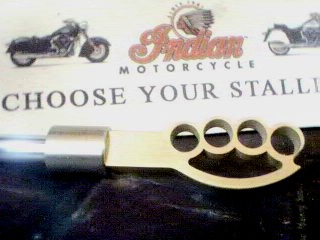
This jockey shifter handle was made on a lathe by one of the guys from the message boards. It was made to look
like a small, aluminum piston, and it looks and feels awesome! Thanks again Rick!
|
|
|
|
|
|
|
|
|
|
|
|
|
|
|
|
My poor Mother. It's a wonder she lived as long as she did; not that it was a long time. She passed in May
of 2000, only months before my accident on the ladder. Over the years, I'd asked my Mom if she'd like to go for
a ride on one of my bikes maybe a million times....never once did she fail to laugh before she'd say NO WAY JOSE! She'd
been on a few bikes in her heyday, she even dated a motorcycle cop at one time, but the experience hadn't been fun.
She'd had a couple of accidents and busted herself up a bit, so she had no intention on getting on a 'murdercycle' again.
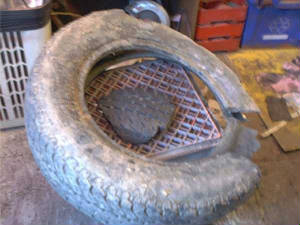
A couple of years before she passed, she'd asked me to change a tire for her on her car. She didn't want the flat,
so it ended up in my shed, taking up space. I didn't give the tire much thought until the day came to mount the
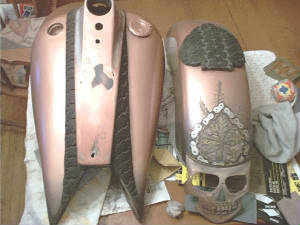
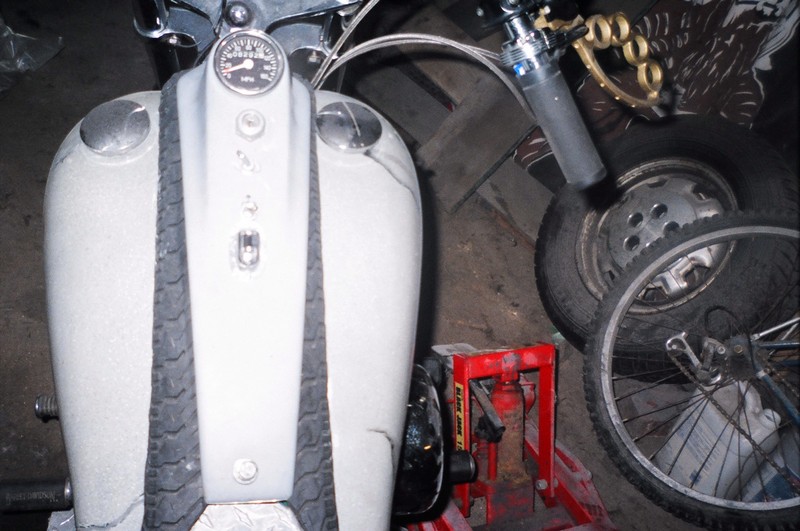
custom fibreglass dash panel onto the stretched tanks on my bike.
I NEEDED A THICK PIECE OF SOMETHING TO FIT BETWEEN THE TANKS AND THE DASH, BUT HAD NO IDEA WHAT TO USE.......TILL I SPOTTED
THE OLD TIRE SITTING THERE. I MAPPED OUT THE BASIC DESIGN I'D NEED AND CUT IT OUT USING A SAW AND A DREMEL. I
PLACED THE CUT UP TIRE BETWEEN THE SPACE AND VOILA....IT FIT! I TRIMMED OFF THE UNNEEDED PARTS AND FIT THE RUBBER IN
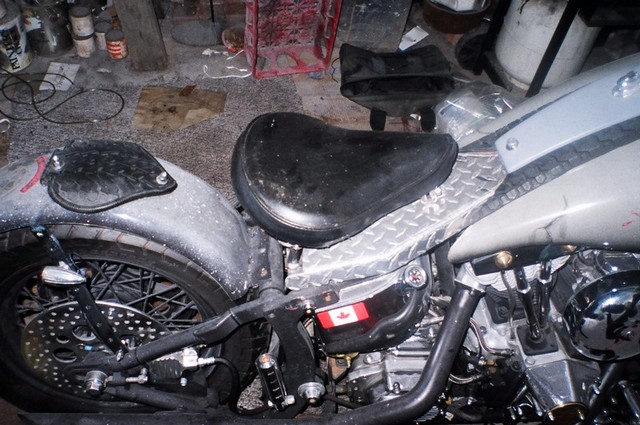
PERFECTLY. WHILE I HAD THE TIRE CUT AND THE TOOLS OUT, I LOOKED AT THE LEFTOVER RUBBER TO MAKE A REAR SEAT.
YUP, A REAR SEAT! I'D NEVER LIKED THE LOOK OF A REAR SEAT ON A FENDER, IT JUST TOOK AWAY FROM THE SMOOTH LINES.
THE LAW BEING THE LAW, I HAD TO HAVE A BACK SEAT TO TRANSPORT THOSE WHO MIGHT FIND THEMSELVES NEEDING A RIDE......SO
I'LL MAKE IT AS LOW PROFILE AS POSSIBLE. HERE'S A PIC OF THE DASH RUBBER AND THE BITCH PAD I'LL BE USING. I CUT
THE SEAT INTO THE SHAPE OF A SPADE, A RECURING THEME ON THIS BIKE.
MOM WAS GONNA RIDE WITH ME THIS TIME....WHETHER SHE LIKED IT OR NOT!
Now THAT was gonna look nice and sleek, keeping the low profile look I wanted,
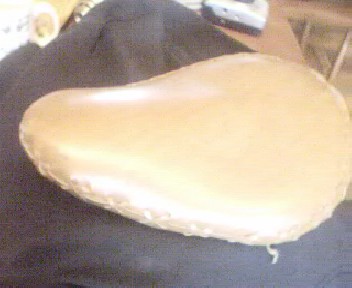
and was going to fit in nicely with the seat I'd gotten from the one and only REV TRAMP. He'd seen the small solo I'd been planning on using, one I'd bought on eBay, only because it was cheap. It was
about the size of a kid's tricycle seat, and very uncomfortable. The good Reverend, knowing of my back and neck problems,
promptly boxed up a nice used LePerra solo along with some other small parts, and sent them off. Man, I was surprised
to see that, and I swear, my neck, back and BUTT were singing in unison!
This is the small solo I was going to use before ol' Rev Tramp stepped up. I'd bought
it from another biker on line, then recovered it myself.
Below is the larger, softer, more supportive LePerra solo Rev Tramp sent, asking nothing in return,
except some pics of me riding! Thanks again my Brother-From-Another-Mother!
|
|
|
|
|
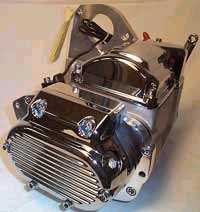
In keeping with my theory of "strong up the
middle", I bartered for this brand new 5 speed transmission from Power House. As usual, I did my homework for this item
as well. Having never bought a new tranny, and never ridden a bike with a 5-speed, I wanted to know what was what,
and who had the best product for my budget. This Power House unit was said to be of equal quality to the stock Harley
tranny, and I was told, as long as I wasn't going to be burning the tires off at every light, or popping wheelies all
the time, then this one was going to be great for what I needed. I figured in my mind, I had a brand new frame, a brand
new engine (rebuilt top to bottom) so to add to the strength up the middle, I'd need a brand new tranny. The only thing
left, was a brand new primary drive and clutch pack, and the bike would be practically new. The drive train would be
virtually brand new, so I could save money on the "extras" or "outside" components by buying used pieces. Saving a few
bucks on wheels, a front end, fenders, tanks, etc... would be passable, seeing as the strength was in the drivetrain.
I was doing well so far, and on my way to my dream bike.
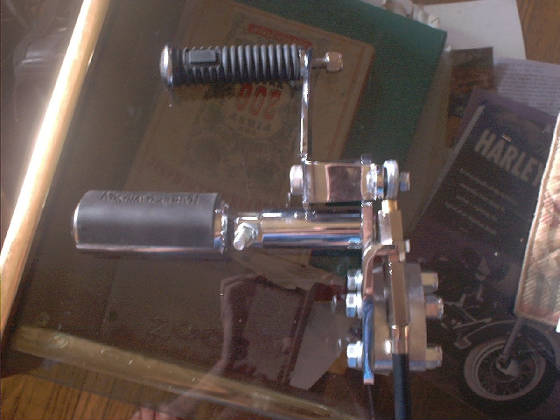
Another one of the guys on one of the boards made me this shifter handle. Bob is an awesome machinist,
and some of the things he does are out of this world. He told me he made a mistake doing this, so he sent it to me free!
Man, if this is the stuff he calls a mistake....I'm gonna start raiding his garbage!
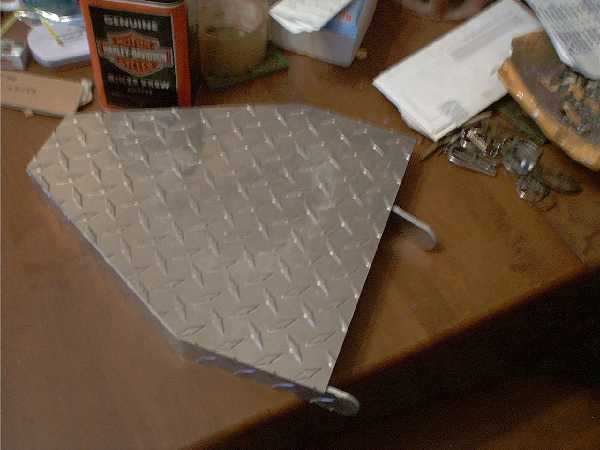
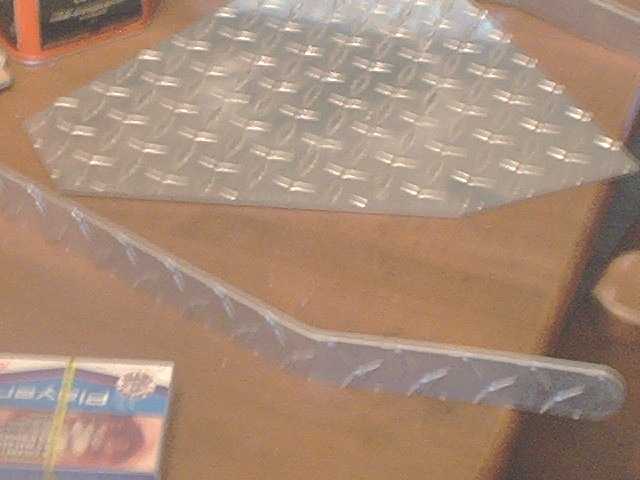
Another piece on the bike that was hand made, is the frame cover under the seat. This piece
is to keep the battery, wire connections, fuses, and oil tank covered from rain, dirt, etc. Now, I priced these in the
catalogues at $80.00 US for a piece of chromed tin. Out-effin'-rageous! Now, not only was that out of my price
range, but I thought about the possibility of having one of millions of the same thing. These parts are pretty
well mandatory for softail frames, and every softail rider has one. While I know I needed one, there was no way
I was going to pay that price, just to have the same thing millions of others did. I went to a metal reclaiming yard
and bought a 24"x 24"x 1/8th" piece of aluminum diamond plate. I designed the shape of the cover from poster board,
and taped it together. Then I disassembled it, and measured and drew out the individual pieces for it. I went
over to a friend's business that I'd worked with before, and showed him what I wanted to do. He runs a shop that cuts
different materials with computer operated routers on large tables for signs. I drew out the different components on
the computer, sent the drawing to the table, and router-cut the aluminum into the pieces I needed. Then, after scouring
the city for someone who'd weld the aluminum cheaply, with no takers, Rick again came to the rescue and offered to do it for
me at no cost, while he was at work! Whatta buncha guys, I tell ya. So, after searching my town for a month, trying
to find someone who'd take this simple job on to no avail, here's a guy in Virginia who offered to do it for free! I
wish there were more people like that. Rick shipped it back to me, and while it's not the fanciest looking frame
cover out there, it sure is unique. And that's the main word I search for when it comes to designing this bike. UNIQUE!
I will never mistakenly hop on someone else's bike thinking it's mine, that's for sure, and while it's not the most costly
bike out there, it's MINE....and it's DIFFERENT. No cookie cutter machine for this boy!
|
|
|
in pieces....
then welded...nice...nice and different!
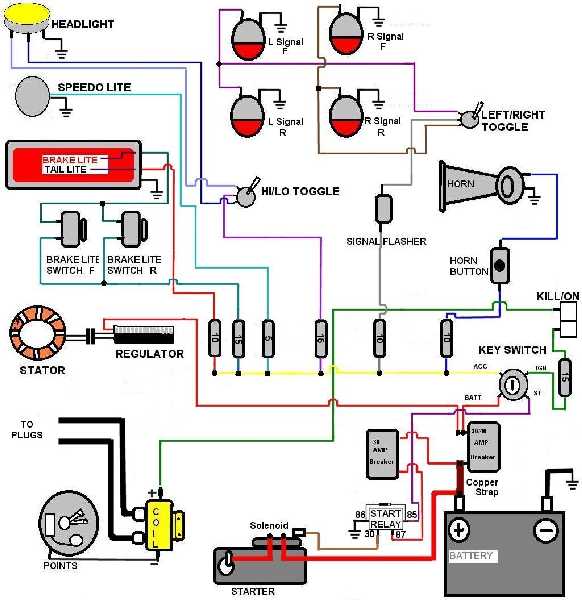
OF ALL THE THINGS I HAD TO DO ON THIS BIKE, I KNEW THE ELECTRICAL SYSTEM WAS GOING TO
BE THE MOST DIFFICULT. A FEW YEARS EARLIER, I'D ALMOST ELECTROCUTED MYSELF, INSTALLING A CEILING FAN, SO
WIRING A MOTORCYCLE FROM SCRATCH WAS GOING TO TEST MY METTLE, NOT TO MENTION MY PATIENCE.
OBVIOUSLY, I'D NEVER TRIED ANYTHING LIKE THIS BEFORE, SO LIKE ANYONE ELSE, THE FIRST PLACE I WENT
TO LOOK FOR HELP, WAS MY TRUSTY CLYMER'S MOTORCYCLE MANUAL. NOW, BUILDING A CUSTOM BIKE HAS MORE THAN A FEW SNAGS, ONE OF WHICH IS, THERE'S NO FRIGGIN' MANUALS!!!!! I CHECKED THE CLYMER'S
BOOK, AND WHILE THEY HAD ELECTRIC SCHEMATICS FOR A FEW DIFFERENT MODELS, OF COURSE NONE OF THEM WOULD FIT MY CONFIGURATION.
I LOOKED AT THE MILES OF COLOURED SPAGHETTI DRAWN IN THE BOOKS AND JUST LAUGHED. ONE OF THE GOOD THINGS
ABOUT HAVING A CUSTOM BIKE, WAS THAT I DIDN'T HAVE 1/10th OF THE WIRING THAT A STOCK BIKE HAS. I STARTED PERUSING THE
INTERNET, LOOKING ON DIFFERENT BIKE SITES FOR SOMETHING SIMILAR TO WHAT I WAS USING, TO NO AVAIL. I ASKED FOR HELP ON
A FEW DIFFERENT BIKE SITES, BUT NOT HAVING A DECENT DESCRIPTION OF WHAT I NEEDED, NO ONE COULD REALLY HELP.
IT'S THEN THAT I KNEW WHERE TO FIND HELP, AND I TRAVELLED BACK TO THE RELIABLE CONFINES OF TERRY'S
SWAP & TECH BOARD I KNEW THAT THE GOOD MEN AT
TERRY'S WERE THE ONLY ONES THAT COULD HELP, AND HELP THEY DID
I DREW A PICTURE USING MY "PAINT" PROGRAM ON THE COMPUTER, AND ASKED THE GUYS THERE IF ANYONE KNEW HOW TO
"CONNECT-THE-DOTS" TO MAKE MY BIKE RUN. I EXPLAINED WHAT I WAS USING, HOW THINGS WERE SITUATED, AND WITHIN A DAY OR
TWO, I HAD MY ANSWER! SIMPLE AS THAT. THE INFAMOUS RIPPER TOOK MY PICTURE, AND USING HIS
OWN PAINT PROGRAM, VIRTUALLY WIRED THE PIECES TOGETHER. HE ALSO SAID HE'D SEND ME A FEW OF THE MISSING PIECES I DIDN'T
HAVE AT MY DISPOSAL, AND AT THE TIME OF THIS WRITING, I AM WAITING BY THE MAIL BOX FOR A FEW CIRCUIT BREAKERS, DIODES, COPPER
STRAPPING.....ETC.... AS SOON AS I GET THOSE, I SHOULD BE ABLE TO FINISH WIRING THE BIKE, AND ACTUALLY START THE BIKE!!!!!!!! A THOUSAND THANK YOU'S TO OL' RIPPER, (IF IT RUNS!) WITHOUT HIS HELP, I'D
HAVE NEVER BEEN ABLE TO DO THIS ON MY OWN.
THIS IS THE ACTUAL PICTURE THAT I DREW, AND THAT
RIPPER DREW THE WIRING AND EXTRAS FOR THAT WILL START MY BIKE
(I FRIGGIN' HOPE!)
NEW
SUICIDE SHOVEL PHOTOS
AS OF FRIDAY, OCTOBER 21st
| SUICIDE SHOVEL |
|
|
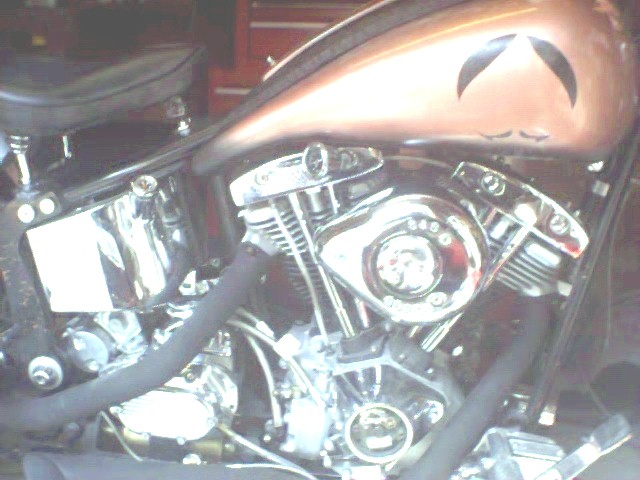
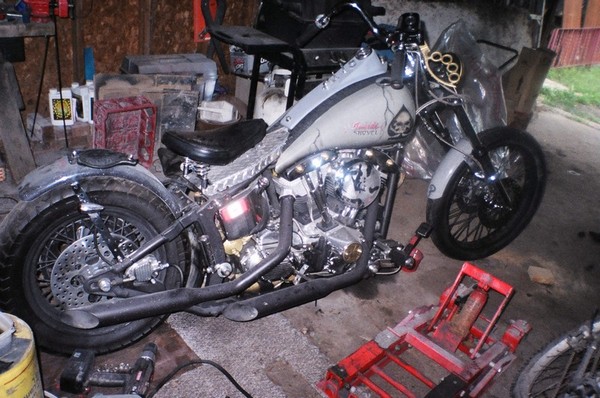
| THIS IS HOW SHE'S LOOKIN' TODAY |
|
|
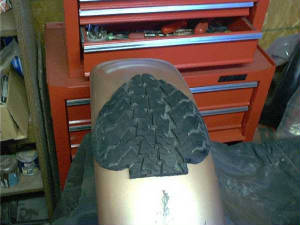
| THESE ARE THE CUSTOM TANKS WITH THE TIRE TREAD DASH PANEL |
|
|
| CHECK THE BITCH PAD...MORE TIRE TREAD |
|
|
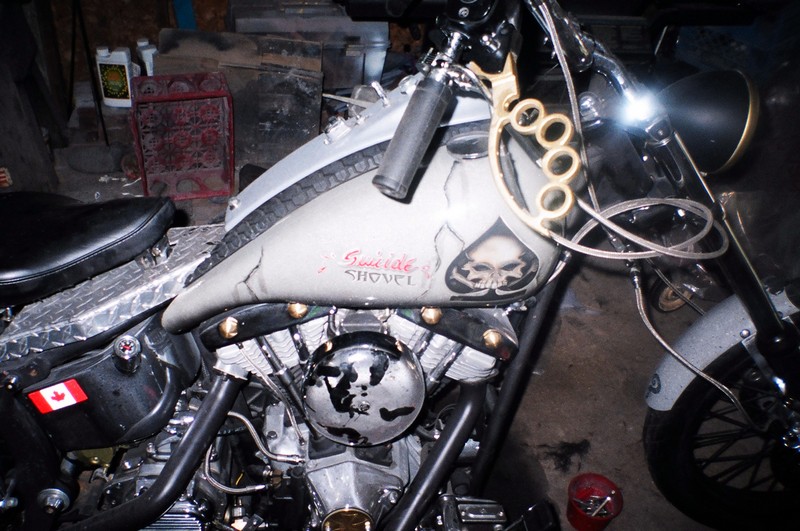
| FLAT GRAY PRIMER SPLATTERED WITH BLACK AND WHITE ENAMEL TO GIVE A GRANITE LOOK TO THE TANKS |
|
|
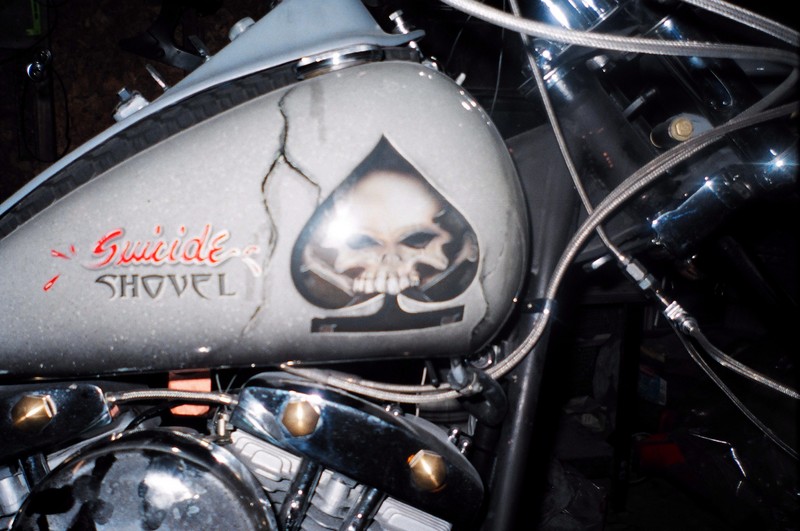
| I AIRBRUSHED THE SPADE WITH THE JOLLY ROGER |
|
|
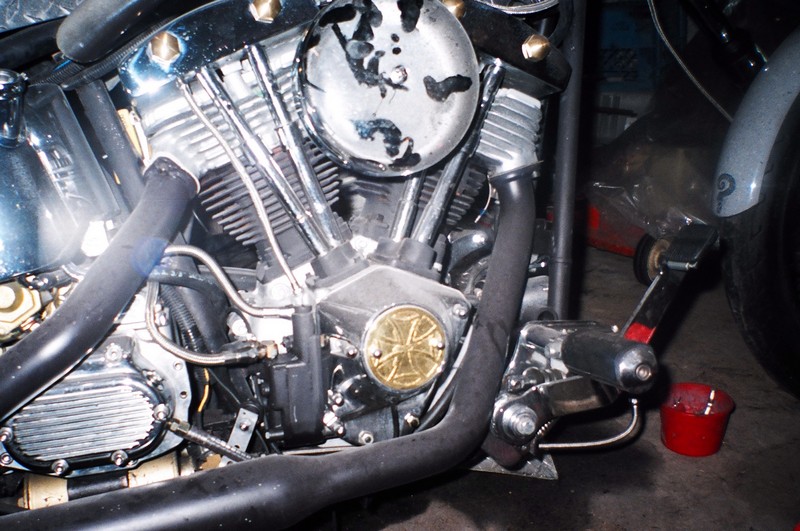
| THE BLACK MARKS ARE MY GREASY FINGER PRINTS! NOTE THE AWESOME BRASSWORK BY MUDDY AND WEYLAND |
|
|
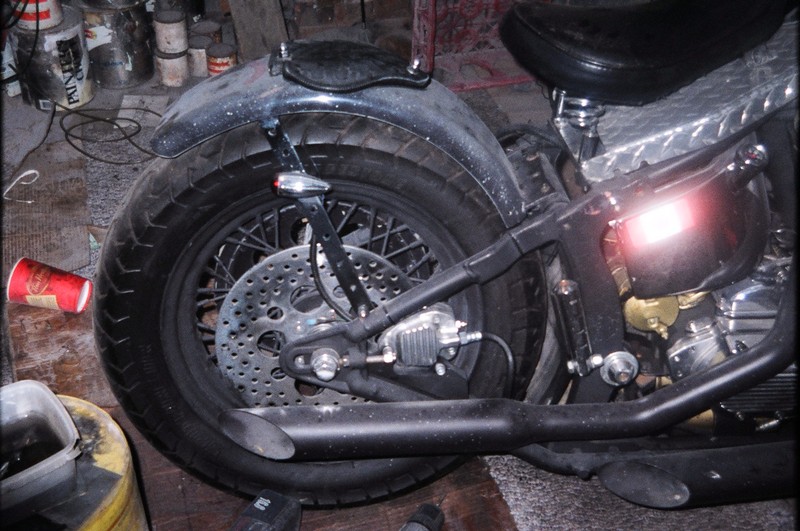
| BLACKED OUT WHEELS AND PIPES LOOK COOL |
READER'S PICS
|
|
|
|